Maintaining Customer Records
Overview
When the agency receives additional or changed information from an existing customer (i.e., an additional address) the information in OAKS FIN must be updated to reflect the detail of the change. The process for maintaining accurate customer information in OAKS FIN is shown below.
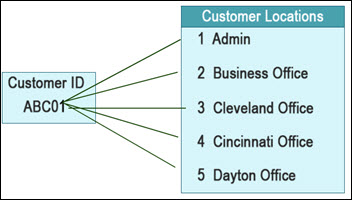
OAKS FIN allows a one-to-manyone-to-many relationship to exist between customer IDs and address location codes. There may be one customer (Customer ID) but the agency is able to add multiple addresses (Locations) to the customer.
If the customer is an agency of the state of Ohio (created by State Accounting for each agency) an Origin Code must be assigned to each customer location. That code will determine how the item is routed for review and approval.
Steps
Update Customer Information
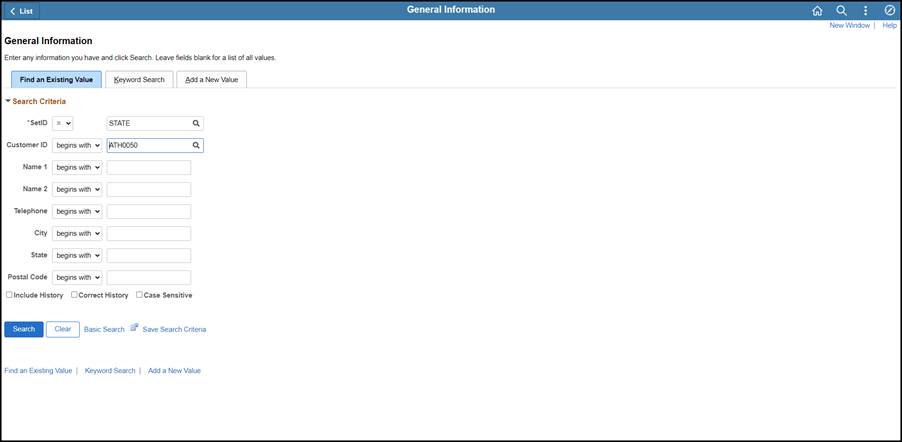
- Click the Find an Existing Value tab.
- Verify the selling agency's business unit is displayed in the SetID field.
- Enter as much search criteria as necessary to find the customer.
- The Customer ID (buying agency or external customer ID) is best to enter. If not known, use the Look up Customer ID tool.
- Click Search.
- After conducting a search, click the Recent Search Results icon at the end of the breadcrumb navigation anytime to display the Recent Search Results in a pop-up window.
- The Customer record will display.

- Customers with multiple locations will have multiple entries.
- Select the appropriate location in the Address Locations section.
- Make changes as necessary.
To add an additional address location:
- Click the Add a new row icon in the Address Locations section.
- Include a Description to make it easier to distinguish between locations.
- Determine if the address location should be marked as the Bill To address and/or Sold To address and if it is the Primary address for that function.
- Set the Effective Date – this is the date on which the new address becomes effective.
- Defaults to the current date.
- Click on the Physical Nature dropdown list and select whether the selling agency is providing "Goods" or "Services."
- Click on the Where Performed dropdown list and select an appropriate option for where the goods are shipped or the services performed.
- When the customer is another state of Ohio agency, use the look up tool to find the AP Origin code provided by the buying agency for this address.
- The AP Origin code determines how the voucher will be routed for approval.
- An AP Origin code is required for customers that are state agencies.
- This field does not apply to customers other than state agencies.
- Enter an AP SpeedChart only if provided by the buying state agency for recurring charges.
- Enter information into the fields for the physical address.
- Country must be entered prior to populating the remaining address lines.
To change address location information:
- Click the Correct History button.
- The Correct History button is used to make changes to existing information and places the record in “correction mode.”
- The button will turn grey to indicate that correction mode is activated.
- If the Correct History button is not clicked before changes are made, then, when the save button is clicked, a message appears indicating the correction mode has not be selected and the changes will not be saved.
- Select the appropriate address location to be updated.
- There are several options to find the address location:
- The View All button which will show all of the address locations on one page. However, if there are a lot of address locations scrolling may be required.
- Use the left and right arrows to click through them one at a time.
- Use the Find link to find an address location based on a specific search term.
- Make changes by clearing existing Address Details and entering new information in the fields.
To inactivate an address location no longer valid:
- Click the Correct History button.
- Select the appropriate location no longer used.
- Select "Inactive" from the dropdown list found on the General Info tab in the Address Details section for that address location.
- There are cases in which an old address should be retained and left active - for example, if the new address is an alternate address or a new location for a company with multiple locations.
- Do not inactivate a location if there are open items.
To reactivate an address location:
- Click the Correct History button.
- Select the appropriate location to be reactivated.
- Select "Active" from the dropdown list found on the General Info tab in the Address Details section for that address
To add or change an AP Origin Code in an existing customer address location:
- Click the Correct History button.
- Find and select the appropriate location with the AP origin code that needs updated.
- Update the AP origin code in the AP Origin field found on the General Info tab in the Address Details section for that address
- An AP origin code is a unique three-character code that is tied to a specific location for a customer that is an agency of the state of Ohio.
- The buying agency will provide the AP Origin Code for that specific location.
- If the wrong AP origin code is used the voucher might not get routed to the right person for approval, which could delay payment.
- Use the Look Up AP Origin icon to see a list of AP origin codes for that specific customer.
- Choose the code given by the buying agency.
To add or change a Speedchart in an existing customer address location:
- Click the Correct History button.
- Find and select the appropriate location.
- Add or change the code in the AP Speedchart field.
- Use the Look up icon for a list of Speedcharts for the customer.
- A Speedchart is not required but may be provided by the buying state agency for recurring charges.
- This field does not apply to customers other than state agencies.
- Speedcharts are used in OAKS FIN as a shortcut to enter frequently used ChartField combinations. Using a Speedchart will make creating or updating a voucher faster and more efficient since it pre-populates information / data.
To add or change phone/fax information:
- Click the Correct History button.
- Select the appropriate location to be updated.
- Click the View Phone Information link.
- Make changes by clearing existing field information and entering new information.
- Click Save to save any updates made.