Managing Requisition Status
It is the requisitioner’s responsibility to monitor the requisition.

In this example, you have entered a requisition for tablets and IT support.
Now you need to find out if it has been approved.
Step-by-step:
- Main Menu > eProcurement >
Manage Requisitions
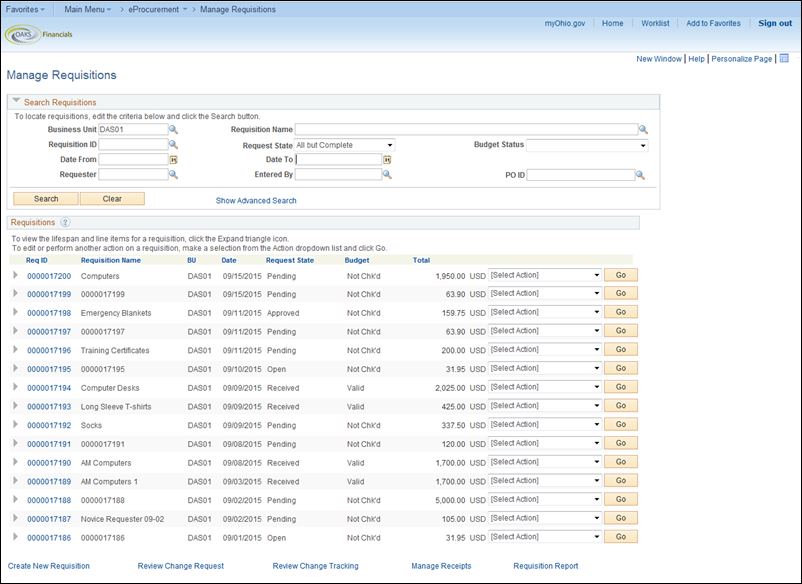
- Use the Manage Requisitions
page to review requisitions created. Once you save a requisition,
you may use this page to review, edit, or delete your requisition
and to check its status.
- If you know the specific Requisition Name or ID number, you can
enter it in the Req Name/ID
field.
- Use the Date From and Thru Date fields to help narrow
your search if you do not know the Requisition Name or ID.
- Click the Search button
to display the search results
To sort your search results, you can sort each column in alphabetical
ascending or descending order by clicking the name of the field by which
you want to sort.
- The Status of a requisition
may be:
- Open: A requisition
has been created and saved but not yet submitted for approval.
- Pending: A requisition
has been submitted into approval workflow and is awaiting approval.
- Approved: A requisition
is approved and a purchase order may be created.
- PO(s) Created: A requisition
has been sourced to a PO.
- Dispatched: A requisition
has been sourced to a PO, and the PO has been dispatched.
- Received: A receipt
has been created for the items received.

- The Approval Status action
takes you to the Approval Status
page to view the different approvers and their status for this requisition.
This icon appears after a requisition has been submitted to approval
workflow.

- The Cancel action allows
you to cancel any open, approved, or pending requisition that has
not been budget checked.

- The Edit action allows
you to edit a requisition you already created. This icon is only available
before OAKS sources the requisition to a PO. After a PO has been created
you will be able to use the Edit function to create a Change
Request.
- The View Cycle action shows
you what stage of the requisition life cycle the requisition is in
currently.

- The View Print action will
give you a printable version of your requisition.

- OAKS does not encumber funds at the requisition
level. The budget field is updated at processing and may not reflect
the actual budget status of the PO.
- To view the information on the requisitions, click the Requisition
ID link.
- The Requisition Details
page displays the basic information from the requisition.

- Click the Expand Section
icon
 to show
more details about the requisition.
to show
more details about the requisition.

- Click the PO information
link.
- The PO Information area expands to show more details about the
requisition.
- PO Number
- PO Status
- PO Line Information contains Due
Date, Ship To,
Quantity, and Price.

- The Requisition Details
page displays the ship to and accounting information for the line
on the requisition.
- Click the Return to Manage Requisitions
link to go back to the Manage Requisitions
page.
- Click the View Cycle action
for a requisition number to view where the requisition is within the
requisition life cycle.
- This is a standard life cycle in OAKS.
- An active link is created for each completed
step in the cycle. You may click on any of the active links to view
more information.
- Click the Approvals button
to see information about the approval of this requisition.

- Use the Approval Status
page to view the approval levels for this requisition. You can also
reach this page by clicking the Approvals
action on the Manage Requisitions
page. Special Approvers and Ad Hoc Approvers would also be shown here
on a separate approval line.
The Approval
screen also shows the unexpanded section Line
Information.

- Click the Expand Section
icon .
- Expanding the Line Information
shows the items ordered on this requisition. There is an additional
option, the View Line Details
button.
- Click the check box in front of the requisition line and click
the View Line Details button.

- The requisition line details are displayed showing Ship
To, Attention, Due Date, Qty, Total, and Line Distribution.
- When you are finished viewing the line details, click the 'X' in the upper right hand corner
to close the window.
- Click the Return to Manage Requisitions
link to return to the Manage Requisitions
page.