
Revised:10/07/2024
Before a recurring bill invoice can be generated, a template must be created and saved with a cycle, frequency, and schedule. This will cause it to appear on the Recurring Bill Schedules as shown below.
Once a template has been created and saved, it's time to:
Verify Recurring Bill Schedules
Create Recurring Bills
To verify that a bill is scheduled to be generated, check the Recurring Bill Schedule page as described below.
Verify that the Business Unit field is populated with the appropriate code.
Click Search to see the list of bills ready to be generated.
Search Results are displayed at the bottom of the Recurring Bills Schedule search page.

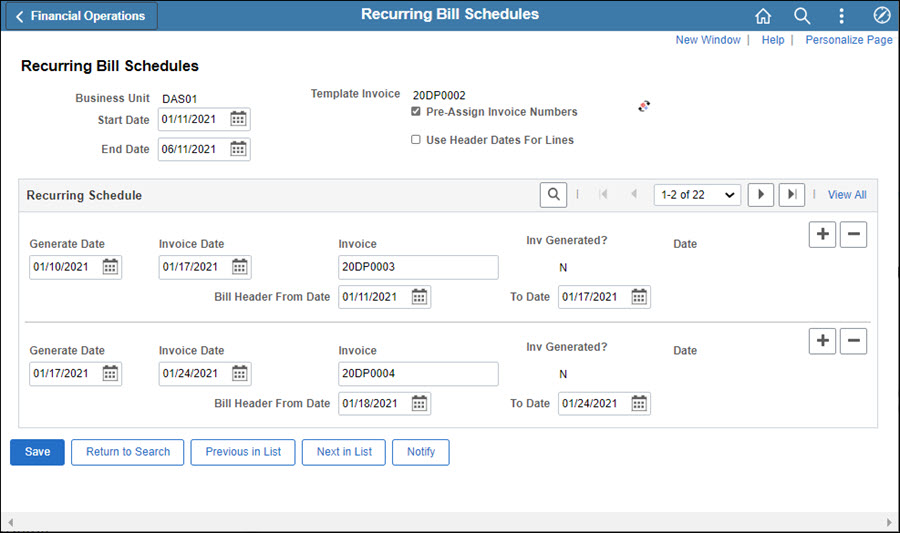
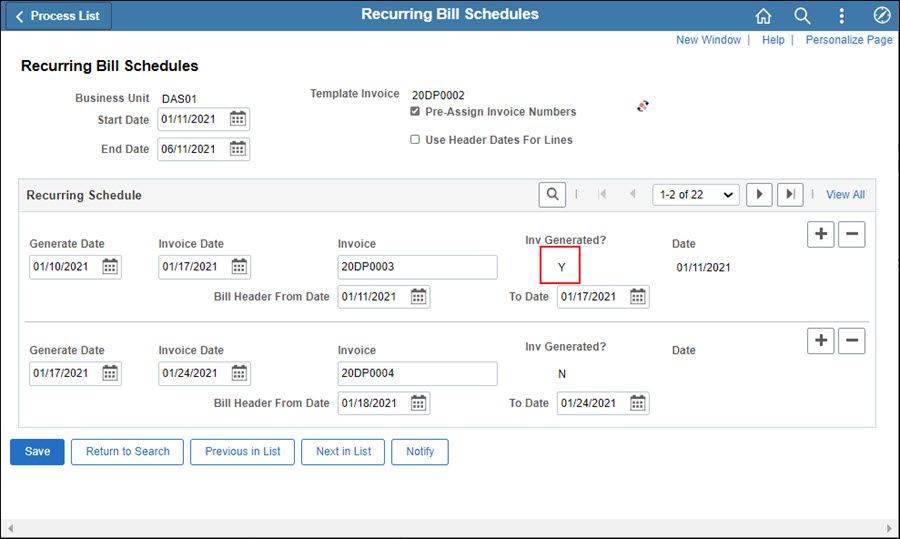
Click on an Invoice number to see details about the recurring bill, its associated Template Invoice, and its Recurring Schedule.
![]()
Important fields on this page:
Template Invoice - Displays the invoice number of the template for the recurring bill.
Generate Date - The Generate Recurring Bills process will create the bill when it is run on or after this date.
Invoice Date - Displays the date the customer is invoiced.
Invoice - Displays the invoice number of the newly created bill.
Bill Header:
From Date - Displays the beginning date of the billing cycle for this bill.
To Date - Displays the end date of the billing cycle for this bill.
INV Generated? - Displays a "Y" or "N" to show whether or not OAKS FIN has created an invoice for this bill.
Date - Displays the date on which this invoice was created.
Recurring bills can be generated based on the Bill Cycle ID, Invoice ID, or Customer ID.
As with any other batch process, a Run Control ID is required. A Run Control ID is a set of information selected and saved for running a specific report or process in OAKS FIN. Users can create their own Run Control IDs.
Each time this process is begun, the user has an option to:
Create a new Run Control ID (as described below).

Click the Add a New Value tab.

Enter a descriptive name consisting of up to 30 alphanumeric characters, with no space, in the Run Control ID field. Some agencies have specifications for the format.
Click the Add button.
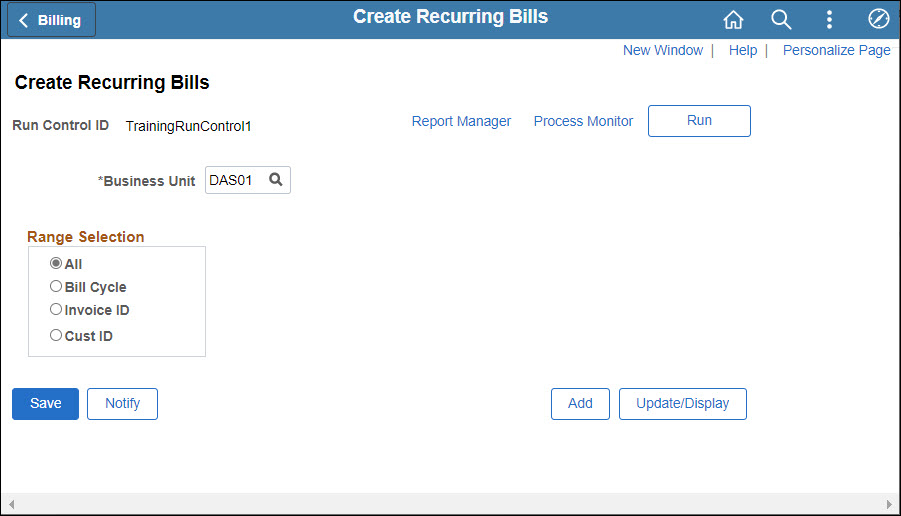
Verify that the Business Unit field is populated with the agency's BU code.
Make a Range Selection -- Bill Cycle, Invoice ID, or Cust ID.
A range selection is not required; however, if not specified, OAKS FIN will print every invoice for that Business Unit with a status of “New”.
Populate the additional field(s) that displayed when the Range Selection was selected.
Click Save (if this Run Control ID is to be used again).
Click Run.

Confirm that the process "BIRECUR" (Bill Recurring) is selected.
Click OK to close the window and return to the Create Recurring Bills page.

Click the Process Monitor link to review the status of the run request.
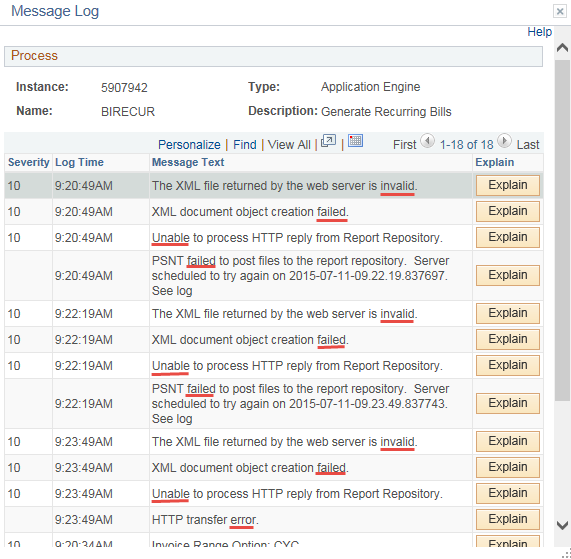
The Process List page displays.

Click Refresh periodically, until Run Status displays "Success", and Distribution Status displays "Posted."
“Success” means that OAKS FIN has finished processing and the job ran successfully. “Posted” means OAKS FIN has successfully created the statement.
Click the Details link on the row with the Process Name "BIRECUR" (recurring bill) and the Instance number.
Click the Message Log to review the process steps to verify that there were no errorserrors.
If there were no errors, proceed with these additional verification steps. This involves navigating back to Recurring Bill Schedules.
The Recurring Bill Schedules page displays.
If a long list is shown by default, add search criteria to narrow the results.
Click the link of the Invoice number just run.
The Recurring Bill Schedules page for that invoice displays.
Verify that the invoice has been generated for the most recent in the series of recurring bills by checking for a "Y" below Inv.