Creating a Single Payment Voucher
The Single Payment Voucher (SPV) exists to reduce the effort required
to make a one-time, small dollar payment to suppliers not in the OAKS
FIN supplier database. Single Payment Vouchers may not be used when:
- the supplier is established and is active in the OAKS FIN supplier
database, or
- the account code being used is reportable to the IRS, or
- the amount of the payment requires a purchase order to be completed.
1099-Reportable Account Codes are not to be used on single payment vouchers.
Payments using any 1099-Reportable Account Codes should be processed on
regular vouchers in order for the transactions to be reported correctly
to the IRS and the payee.
Single Payment Vouchers (SPV) allow agencies to enter vouchers without
referencing a supplier in the OAKS FIN supplier file. The SPV is to be
used only for a refund or a subsidy payment. The SPV can be entered online
in OAKS FIN or submitted via the INF02 Voucher Interface.
SPVs cannot reference an encumbrance. If reference to an encumbrance
is needed for these vouchers, have the supplier entered into the OAKS
FIN supplier file and process it as a regular voucher.
When an SPV is entered online in OAKS FIN, a warrant is issued unless
the agency enters the supplier banking information on the voucher.
- Click here
for assistance with accessing the OAKS FIN AP Module.
Steps
- myOhio.gov
> OAKS FIN > Main Menu > Accounts Payable >
Vouchers > Add/Update > Regular Entry
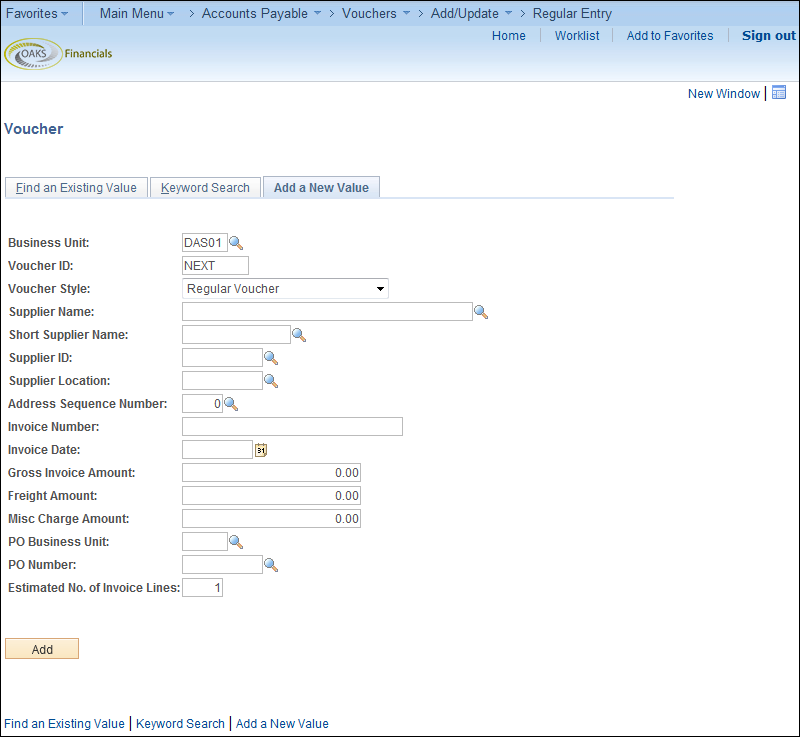
- Select Single
Payment Voucher from the Voucher
Style

 dropdown list.
- Enter a single payment ID in the Supplier
ID

 field. This varies depending on whether the
type of supplier and how they will be paid.
- SGLPAYEFT2
- Single Payment EFT (electronic payment) supplier
- SGLPAYCHK2
- Single payment warrant supplier
- SGLPAYBNF2
- Single Payment Benefits EFT supplier
- SGLPAYMED2
- Single Payment Medicaid EFT supplier
- SGLPAYTAX2
- Single Payment TAX EFT supplier
- Click Add

 .
.
- The Single Payment Supplier
tab displays
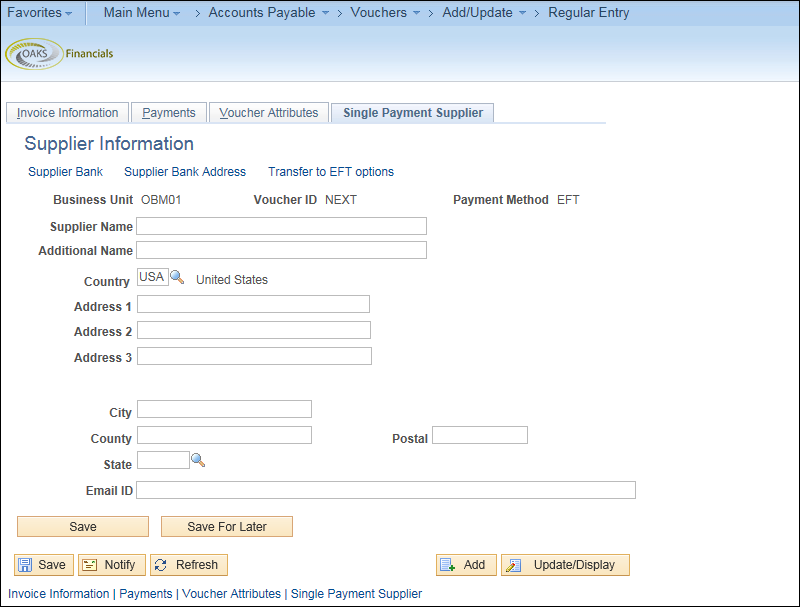
- Enter the supplier name in the Supplier
Name

 .
.
- This data does not become part of the master
supplier file.
- Enter the street or postal address
of the supplier in the Address
1

 field.
- Enter the supplier's City

 .
.
- Enter the supplier's zip code in the
Postal

 field.
- Enter the supplier's State

 .
.
- If supplier "SGLPAYEFT2"
was selected as the Supplier ID for electronic transfer, enter the
supplier's bank information.
- Only enter supplier bank information if the
supplier is being paid by EFT.
- Click the Supplier
Bank

 link.
link.
- Enter the supplier's
bank account number in the Bank
Account Number field

 .
.
- The Depository Financial Institution
DFI
Qualifier

 is only used for Electronic
Funds Transfer and is not appropriate for single payments.
- Enter the bank
Account
Type

 .
.
- Click OK

 .
.
- Enter the payment method in the Location

 field.
- EFT - Electronic Funds
Transfer
- CHK - Warrant (check)
- Enter the time line for voucher payment
in the Pay
Terms

 field.
- Net 30 - Payment is
due in 30 days.
- 2/10 Net 30 - The supplier
offers a 2% discount for payment within ten days; otherwise, payment
is due in 30 days.
- Due Now - Payment is
due immediately.
- Click here for Pay
Term guidelines


- Enter the supplier's Invoice
Number

 .
.
- This is the number on the invoice
from the supplier. OAKS FIN uses this number as a reference when
checking for duplicates.
- Enter the date printed on the supplier's
invoice in the Invoice
Date

 field in MM/DD/YYYY format.
- Discount calculations are based on this field.
- Enter the current date by typing "today" in the field.
- An agency‘s responsibility to make prompt payment does not
begin until the agency receives a proper invoice as defined by
OBM Rule 126-3-01 (A)(4-5). If the agency receives a defective
or improper invoice from a supplier, there are certain responsibilities
under the Ohio Administrative Code. OBM Rule 126-3-01 (B)(4)(b)
details the actions to take upon receiving a defective or improper
invoice.
- Utilities regulated by Public Utilities Commission (PUCO) may
bill late payment charges based on the rates approved by PUCO.
This is not subject to ORC 126.30.
- Except for prompt payment fees and PUCO late fees, late charges
of any other type will not be paid.
- Enter the date on which the state
received the proper invoice in the Invoice
Received

 field.
- This is not the date on the supplier
invoice. It is the date the invoice was received and deemed a
valid invoice. Interest calculations are based on this field.
- Enter the date on which the goods
or services were received in the Last
Receipt Date

 field.
- A correct Last
Receipt Date must be entered. Procedures for determining
the correct last receipt date are issued from OBM/State Accounting.
- Refer to the "Determining
Last Receipt Date" topic for guidance. .
- Enter the lesser
of "current charges" or "balance due"
as it appears on the invoice in the Invoice
Total

 field.
- The
total voucher amount must correspond to the invoice amount. An
invoice may not be altered by the agency. If the invoice amount
is incorrect, the agency should request a new invoice from the
supplier, according to requirements of prompt pay legislation.
.
Exclude
"sales tax" listed on the invoice image when the
supplier's "remit to" is in Ohio or when OHIO sales
tax is explicitly stated (other taxes such as excise taxes,
local taxes, environmental taxes, or other types of taxes
are not exempt to the State and should be included).
Exclude past charges.
Exclude
late payment fees (unless the supplier and service is a utility
regulated by the Public Utilities Commission [PUCO]).
- Enter a Description

 of the invoice charges.
- An example might be "Overpayment reversal".
- Enter the amount to charge to the
associated ChartFields in the Total
field.
- The total of all amounts entered on the distribution
lines for a voucher line must equal the extended amount on the
invoice line. An error message appears if there is an imbalance.
- Enter the ChartFields

 to
be charged by the voucher, including at a minimum:
- There are five ChartFields that are required for all vouchers:
Fund, Account, ALI, Department, and Program.
- Funds segregate accounting transactions for activities
or objectives and correspond to the fund structure that the
state used in legacy systems.
- The Account ChartField is the highest-level description
for an entry. Account values are classified in five broad
account types: Asset, Liability, Equity, Revenue, Expense,
Transfer In and Transfers Out.
- The ALI (appropriation line item) code is the legal spending
authority authorized by the budget bill.
- The Department is the agency responsible for the cost of
the voucher.
- The Program ChartField describes a discrete activity within
an agency‘s organization that is intended to provide a specific
good or service in response to an identified social or individual
need or problem.
- When using a capital expense
account, the Project ChartField will also become required.
- Leave the GL Unit

 as
STATE. This allows all financial reporting to roll up to one
entity.
- The appropriate account code
must be used. Account code definitions are issued from the
office of the Administrator of State Accounting. Account code
definitions may be updated periodically during the year.
- Refer to the "OAKS
FIN Account Code Table Online Reference" for assistance.
Click here

 for additional guidance regarding supply vs. equipment account
codes.
- 1099-Reportable Account Codes are not
to be used on single payment vouchers. Find the 1099-Reportable
Account Codes on the OBM website at Reportable
ChartField Value Listing.
- Payments using any 1099-Reportable Account
Codes must be processed on regular vouchers in order for the transactions
to be reported correctly to the IRS and the payee.
- Add Attachments
in the Header.
- Items such as invoices
or backup documentation must be added by the Voucher Processor.
- Select
the Attachments

 link.
link.
- The Voucher Header Attachment page displays.
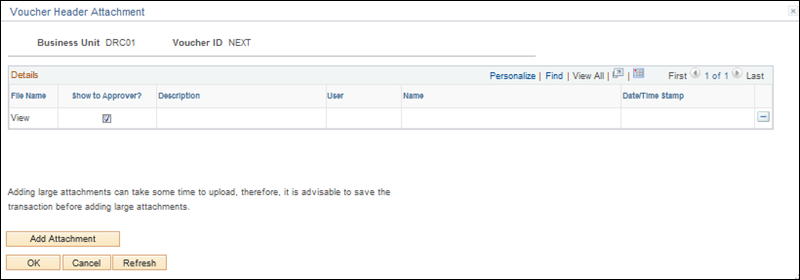
- Click Add
Attachments

 .
.
- Browse

 to
find the appropriate item and then click Upload.
- Click OK.
- The Invoice Information page displays and the number of
attachments is listed next to the Attachments

 link
link
- Click the Payments

 tab.
tab.
- The Payments page displays.
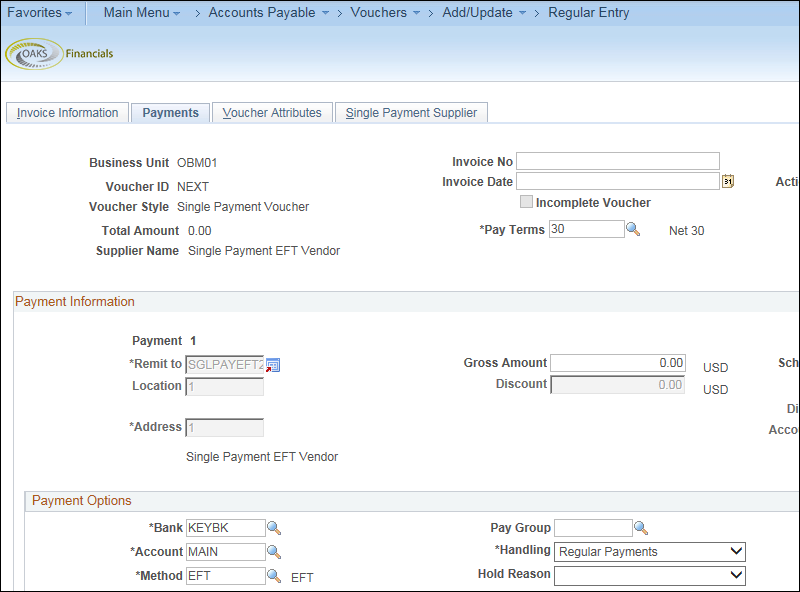
- The Payments page displays basic information
about how this voucher will be paid. This page also allows the
user to enter or change the payment method, schedule, and payment
options.
-
- A payment can also be put on hold
by selecting the Hold
Payment

 checkbox.
- Remember to resolve the reason for the hold
and to remove the hold as quickly as possible.
- Click the Voucher
Attributes tab.
- The Voucher Attributes page displays.
Review the data for accuracy.
If there are inaccuracies, return to the
appropriate page(s) and make corrections as necessary.
Review the voucher information,
such as accounting instructions and approval information.
- The voucher processor can
change the Pay Terms on
the voucher during voucher creation; however, once the voucher
is saved, OBM
State Accounting must be contacted to revise the scheduled
payment terms if necessary.
Click Save
 .
.
Unless a hold was placed, the single
payment voucher is routed for approval. After approval, OAKS FIN
performs a budget check, posts the voucher, and creates the payment.


 dropdown list.
 field. This varies depending on whether the
type of supplier and how they will be paid.
 .
.

 .
.
 field.
 lines can be used for multiple-line
addresses.
 .
.
 field.
 .
.
 link.
link.
 .
.
 is only used for Electronic
Funds Transfer and is not appropriate for single payments.
 .
.
 .
.

 field.
 field.

 .
.
 field in MM/DD/YYYY format.
 field.
 field.
 field.
 of the invoice charges.
 to
be charged by the voucher, including at a minimum:
 as
STATE. This allows all financial reporting to roll up to one
entity.
 for additional guidance regarding supply vs. equipment account
codes.
 link.
link.

 .
.
 to
find the appropriate item and then click Upload.
 link
link
 tab.
tab.

 field) or selecting an agency-specific pre-defined message (using
the Messages hyperlink).
Both messages will display on the warrant (CHK) stub (up to 70-characters),
but free-form Messages will
not display on EFT.
 link in the payment method section.
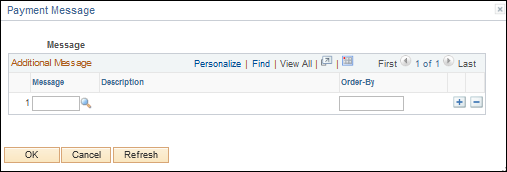
 to select a pre-set message.
 .
.
 checkbox.
 .
.